
Edit Plan Values
Learn about the different ways you can make changes to plan values.
Note:
- If you have a large plan, we recommend that you turn off projected plan values for a faster editing experience.
- You can also edit plan values using a third-party application and import the data back into Visier. For more information, see Edit Plan Values in Bulk.
- This feature is also available through Visier's public APIs. For more information, see Plan Data Load API.
Increase a plan value
You can increase a plan value by doing one of the following:
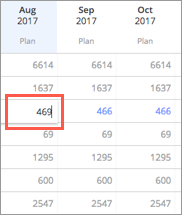
- Type a higher value, as shown in the following illustration.
- To increase the plan value by a specific number, type +n where n is the number you want to increase the value by. For example, to increase the headcount by three, type +3.
- To increase the plan value by a specific percentage, type n%, where n is the percent you want to increase the value by. For example, to increase the headcount by 3 percent, type 3%.
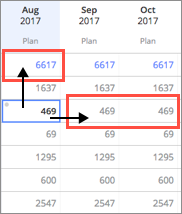
After you edit a plan value, the value rolls forward to future periods and rolls up to create a new total, as shown in the following illustration. For more information on how values rollup to the parent level, see How Plan Values Are Rolled Up.
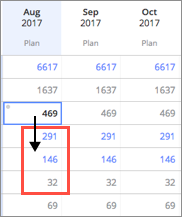
If you are editing a parent cell, the change in plan value is distributed to child cells. Changes to cells are automatically highlighted in blue, as shown in the following illustration. For more information, see How Plan Values Are Distributed.
Reduce a plan value
You can reduce a plan value by doing one of the following:
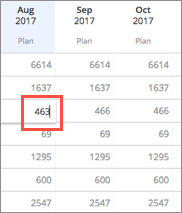
- Type a lower value, as shown in the following illustration.
- To reduce the plan value by a specific number, type -n, where n is the number you want to reduce the plan value by. For example, to reduce the headcount by three, type -3.
- To reduce the plan value by a specific percentage, -n%, where n is the percent you want to reduce the plan value by. For example, to reduce the headcount by 3 percent, type -3%.
After you reduce a plan value, the value does not automatically roll forward. To roll the value forward, on the toolbar, click the Roll this value forward button  .
.
Range Edit
You can apply changes to plan values over multiple periods by applying a Range Edit from the In-context menu. For example, this feature is useful if you want to phase in headcount changes across several months.
To apply a Range Edit:
- Select multiple plan values.
- On the In-context menu, click Range edit.
- Select one of the following options:
- Starting with the previous period value, change the range values by n% each period (compounded): Change each plan value in the selected range by a given percentage. The percentage is applied to the accumulated plan value (the previous period value and the value that has been added or subtracted).
- Change the final range value by n% of the previous period value, and fill in the range using interpolation: Specify the percentage change you want to see for the final plan value and apply a method of interpolation to calculate the rest of the values.
- Fill in range values from n to n using interpolation: Specify the first and final value of your range and apply a method of interpolation to calculate the in between values.
- Change each value in the range by n%: Change each plan value in the selected range by a given percentage.
- Click Apply.
Interpolation methods
The interpolation methods determine the rate in which plan values change over your selected range. You can apply the following interpolation methods to calculate plan values in a Range Edit:
- Linear: The same percentage change is applied to each period. Use this option if you want the same number of employees to be added each month.
- Constant Rate: Similar to how compound interest rate is calculated. What is the constant rate per period that you can apply to last month's total to get to the final number. The additional amount per month will increase slightly as you go. Use this option if you are aiming for a constant orientation burden for the department that you are increasing headcount for.
- Exponential: The percentage change increases rapidly towards the end of your selected time range. Use this option if you want to ramp up employees just prior to an event, but want to keep your total wage costs lower.
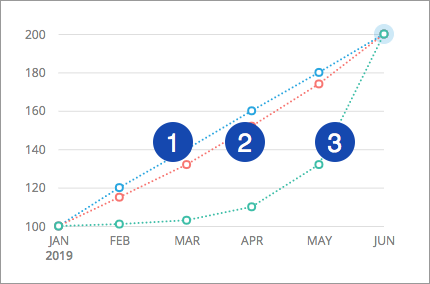
The following illustration shows how the headcount changes from 100 to 200 when each interpolation method is applied.
- Linear
- Constant Rate
- Exponential
Turn off automatic projected values
- On the toolbar, hover over the Projected values button
 .
. - Toggle off the Automatic Projected Values button.
to generate the projected values.